Do you want to teach your children how to make animals from recycled materials? Here we show you the perfect craft made from walnut shells. Here we show how you can make a turtle from nuts, but there are many more animals you can create, let your imagination run wild, and make different animals. It's sure your child will love to learn how to create things from recycled material.
- Card
- Half a walnut
- Yellow and green paint
- Green Card
- Scissors
- Tape
- Black marker
- Glue
Paint half the walnut shell yellow. Make sure to cover the entire surface evenly to ensure a bright, vibrant color.

Make the details of the shell with green paint. Look at this picture. Consider adding small dots or swirls for a more realistic turtle shell appearance.

Copy the base of the turtle on a sheet. See image. Be precise with your outlines to ensure the parts fit together seamlessly.

Fold the green card in half. Put the base of the turtle that you have drawn above the card. This will help create a sturdy base for your turtle.

Review the base of the turtle. Double-check for any uneven lines or shapes that may need adjusting before cutting.

Cut the base of the turtle. Ensure your scissors are sharp to achieve clean edges.

Fold the bottom of the turtle as shown in the picture. Put some glue on the base so it will not separate. Allow the glue to dry completely before proceeding to the next step.

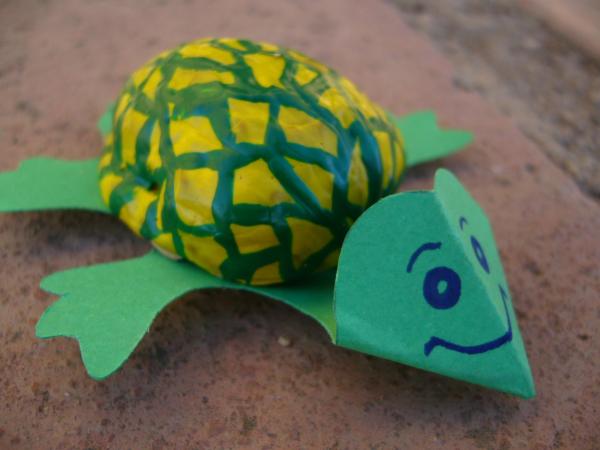
Draw the face of the turtle. An example is shown in the image. You can add details like eyes and a mouth using the black marker for a cute expression.

Put glue on the cardboard base. Put the painted walnut shell on top and that's it, you've made a turtle from a nut. To add more authenticity, you can use small pieces of felt or fabric to create legs and a tail.
Your kids will love making their own toys. This will keep them busy, stimulate their imaginations, and practice their manual skills. For more craft ideas, find out how to make simple toys using recycled materials at home.

If you want to read similar articles to How to make a turtle from walnuts, we recommend you visit our Art & handicraft category.
- You can try making different coloured turtles from nuts. Note that the base shouldn't be larger than a walnut. For variety, experiment with different patterns on the turtle's shell to mimic various turtle species.