Do you like crafting? This is one of the most addictive crafts. Try making butterflies from aluminium cans, we know you'll love it. We promise that your garden will look unique. Use aluminium as it reflects light and you'll have a shiny yard. And you can take advantage of this material that is often thrown away at home. So don't wait to join us at OneHowTo and learn how to make a butterfly out of aluminum cans.
- Metal choice - these can be containers, aluminium cans or aluminium foil.
- Metal shears and paper scissors.
- A light hammer
- A nail
- Coloured wire
- A bead
- Paper
- Fine point marker
- A wooden board
- Acetone and cotton swab
A good trick to making butterfly patterns is to fold a piece of paper in half and draw a wing shape on the crease. Then cut the shape so that when you open it you have perfectly matching butterfly wings.

Cut a piece of aluminum from the can a little larger than your wings and then trace the pattern of the butterfly directly on the surface of the metal with a fine point marker.
Then finish drawing the design. You don't need to be a great artist, just make a simple design freehandedly.

Place your "butterfly" on a piece of wood and, using a hammer and nail, make holes in the aluminum surface following the contour of the wing and the lines of the design.
Hammer gently and try not to make the hole go all the way through the can, but if you do, it is not a problem. This can happen because it requires a lot of practice with a hammer. When finished, remove the ink lines with a cotton swab and acetone (or a damp cloth).

In this step you should be very careful when handling the metal. Cut away anything on the outside of your wing lines. First cut around your design, leaving a little extra space. Then cut it again but closer. For the curves of the wing, it is best to cut a "V" so it is easier cut the metal.
Tip: Use nail scissors so it's easier to cut in tight corners.

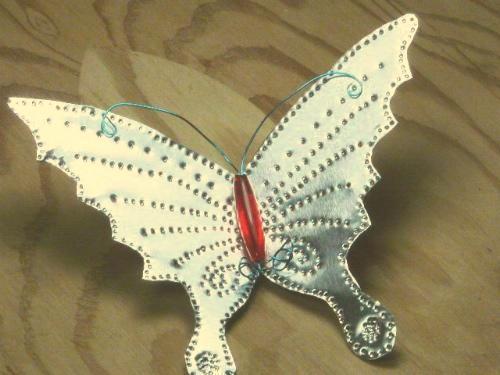
We are now ready to add the body, antennas, and "wire tie". Place three colored wires through the hole, leaving the same length sticking out on both ends.
Punch two holes in the metal, one near the top center and one near the bottom center. These are the holes you will put the wire through to make the wire tie. Tie it in a knot.
Gently move it until it is aligned evenly between the top and bottom.

Put the antennas into shape as seen in the finished work.

Recommendations
- Tiny pieces and metal particles can become airborne when you least expect it, and metal edges are sharp and can give you a nasty cut if you're not careful.
- Closely supervise children and do not let them handle the aluminum.
If you want to read similar articles to How To Make A Butterfly Out Of Aluminum Cans, we recommend you visit our Art & handicraft category.